Valentines Day Series: Layer Cake for Two!
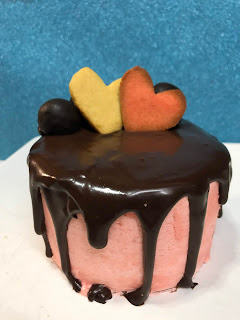
While mine could use some chocolate drip practice, the taste was still on point so I thought I should share the recipe/process here.
This one is super simple since it uses a packaged keto cake mix. I clearly used Kawaii Treats & Eats, but you can certainly sub out your favorite brand and start from there. The rest is essentially all assembly. Which, in my opinion, is the best part!
One final note before we dive in. As usual - I am not one to plan measurements ahead of time. So you will have more than you need of both the Buttercream and the Ganache. Both can be stored in the fridge and used for other delicious treats down the line though so... is it really a bad thing?
INGREDIENTS:
ChocZero Syrups:
Depending on your flavor choices, you can add your favorite ChocZero syrup to the top as well. Caramel anyone?
This one is super simple since it uses a packaged keto cake mix. I clearly used Kawaii Treats & Eats, but you can certainly sub out your favorite brand and start from there. The rest is essentially all assembly. Which, in my opinion, is the best part!
One final note before we dive in. As usual - I am not one to plan measurements ahead of time. So you will have more than you need of both the Buttercream and the Ganache. Both can be stored in the fridge and used for other delicious treats down the line though so... is it really a bad thing?
INGREDIENTS:
- 1 Package Keto Cake Mix (plus all additional ingredients listed, you will prepare this as instructed)
- 40g Sugar Free Chocolate
- 40g Heavy Whipping Cream
- Red Food Coloring
- 1 Batch Swiss Meringue Buttercream (I left the frosting white for the inside layers, and colored it pink for the outside)

- Cake: First, line a small baking sheet (not a cake pan! I used a very small one that would usually fit in the toaster oven) with parchment paper and preheat your oven as instructed on the mix package.
- Next, simply prepare your cake mix as instructed on the package and then split the batter in half.
- Add some of the red food coloring to one batch, and leave the other batch as-is. (I also added different flavor extracts to each, but that is truly up to you!)
- Pour the batter into the prepared baking sheet and spread out evenly. Place in the oven and bake for about half of the instructed bake time, then pull it out to check on it. (I can't give exact times here since ovens and mixes vary. I will say that since the cake is thinner, it will bake quicker than instructed)
- Once your first color is complete, remove and allow to cool. Swap in the second mix and repeat the process once more.
- Once both colors of cake are baked and cooled, grab a circle cookie cutter and cut out two circles from each color. (Or more or less depending on your cookie cutters and how tall you want your mini cake)
- Grab your SMBC and start to assemble the layers. Cake, buttercream, cake, buttercream, etc. Alternating colored/plain cake layers. Place cake into the fridge for 10 minutes to 'set up'. (This makes the outer layer of frosting easier in my opinion. Less sliding around)
- While your cake is setting, crumble up some of the remaining cake into a small bowl. Dollop a small amount of the buttercream into the crumbles and combine. You can roll this out into balls and pop into the fridge for the "cake ball" garnish on top of the finished cake. (I like to vary them in sizes for a cooler finished product. You can also save some crumbles and add them to keto-shakes down the line)
- Once you pull your cake out of the fridge, you will add a layer of the SMBC all over the outside of the cake. Pop into the fridge again to set up this first layer of buttercream. (Does not have to be the prettiest. This layer is just to fill in cracks and coat all the crumbs.)
- Once the layer of frosting is fairly set up, pull out of fridge and add your second layer. Once coated, I popped into the fridge for another round - then used a butter knife to 'smooth' it all out for the finished product. (I don't own an off-set spatula or cake scraper. This was easier for me to do with a butter knife when the frosting was cold)
- Once smoothed - leave out of the fridge and prepare your ganache. (I put mine back in the fridge and it caused my ganache to cool too quickly once poured over the cake. For perfect drips, you don't want to make the same mistake I did!)
- Ganache: Chop all of your chocolate up finely and add to a bowl. Heat your HWC in the microwave on 30% power until just warm. (Too hot and your ganache will seize) Pour HWC over the chopped chocolate and allow to sit for a minute or two - then stir like crazy until it is smooth and creamy.
- Drizzle your ganache over the cake, starting with a 'ring' around the outside to somewhat force the drips, then finish out by covering the middle. Allow ganache to set up slightly before adding garnish.
Chocolate Covered Cake Balls:
Take the cake balls (mentioned earlier) out of the refrigerator, cover with melted chocolate and allow to cool. Arrange on top of cake how you see fit.
Cut Out Cookies:
Make some of your favorite keto-cookies and cut out cute shapes (I went with hearts) to place on top of the finished cade for some added flair.
Truffles:
Whip up your favorite keto friendly truffles and add to the garnish mix on your cake, or arrange around the bottom.
ChocZero Syrups:
Depending on your flavor choices, you can add your favorite ChocZero syrup to the top as well. Caramel anyone?


Comments
Post a Comment